This article will help students study effectively for the CCNA certification exam. Cisco publishes a roadmap every 12 months to add or remove exam topics based on relevance and importance. There is also an on-going shift that affects how many questions you will get for individual topics. For example, IP connectivity domain with 25% of exam points could have most of the questions on only two topics.
Knowledge Domain
Scoring
Network Fundamentals
20%
Network Access
20%
IP Connectivity
25%
IP Services
10%
Security Fundamentals
15%
Automation and Programmability
10%
It is crucial for students to create a study plan based on coverage of all topics and spend more time on key topics. Top 10 exam topics are required to answer questions in multiple knowledge domains. Exam points are weighted higher for core topics and that will affect your test score.
1. Subnetting
Students cannot pass the CCNA exam without solid subnetting skills. CCNA is a timed exam and accuracy is important as well. Subnetting extends to multiple topics and knowledge domains. For example, subnetting is required for IP interface addressing and route selection. Subnetting will follow you to the CCNP exam as well for topics such as route maps.
There are also wildcard masks used for advertising OSPF routes and access control lists (ACLs). The wildcard mask is an inverted subnet mask for advertising or filtering classful and classless routes. Network address translation (NAT) allows host internet access based on ACL wildcard masks. Learn how to calculate a wildcard mask in seconds for the CCNA exam.
There is a lot of anecdotal evidence that suggest students must know how to analyze routing tables for the CCNA exam. This topic will require knowledge of route selection and subnetting to answer questions. There is an algorithm that is used to select routes to install in the routing table. Routers will use the same algorithm to select routes already installed in the routing table for making forwarding decisions. Route selection is based on administrative distance, metrics, and longest prefix match subtopics.
Subnetting skills are required for longest prefix match rule to calculate address range. You will get output from a routing table and asked what route is selected to a specific network or what route is installed. What happens when a network interface is down and how does that affect selection of a backup route? There are also mandatory questions on the configuration of IPv4/IPv6 default and static routes that include route selection.
3. Switch Interconnects
Switching protocols is another core topic and not surprising since most network devices are switches. Consider data centers where most network traffic is between servers that connect via multiple switch types. There is much less traffic that traverses the internet by comparison. You can count on a significant number of trunking and Etherchannel questions that include labs. Switch connectivity also includes subtopics such as switch port settings, VLANs, and spanning tree protocol. LACP Etherchannel is often configured with trunk interfaces to connect switches with Layer 2 and Layer 3 port channels. Wireless controllers are prevalent in the data center and also connect to switches.
4. Wireless Protocols and RF Concepts
Cisco has added a lot more wireless network questions to the CCNA exam recently. In fact, students will have to know everything from RF concepts to wireless security and advanced controller settings from GUI. It is important to study the various features available to lower latency and enable faster roaming. Know how to navigate the controller GUI to enable security features along with authentication and encryption protocols. There are different AP modes such as FlexConnect and CAPWAP tunnel communication to the controller. Consider as well how DHCP and DNS traffic is managed and the various controller interfaces. You should also know how communication works between controller, access point, and clients.
5. Open Shortest Path First (OSPF)
OSPF is an open standard IP routing protocol that is easily the most popular IGP within the enterprise network. OSPF is a core topic with questions on operation, single-area configuration, and how to verify connectivity. You will also get questions based on the output of a show command and determine how a router is configured. Some key topics include router ID selection, DR/BDR election, OSPF network type, and metric calculation. OSPF uses wildcard masks to advertise subnets to neighbors. You should also know how to configure OSPF using the interface method. Make notes on timer interface settings, passive interfaces, and default priority.
OSPFv2 is officially the only dynamic routing protocol on the CCNA syllabus however that isn’t entirely accurate. Since route selection involves administrative distance (AD) you should know the AD values for all default, static and dynamic routing protocols. It is recommended to include OSPF and EIGRP metrics in your study plan as well.
6. Access Control Lists (ACL)
Some of the most difficult topics on the CCNA exam include access control lists and subnetting. CCNA will have concept and configuration questions pertaining to access control lists. For example, select the ACL to deny specific traffic classes for a range of subnets and enable logging. It is important to know how to analyze ACLs and determine what is being filtered.
Study application port numbers, IP protocol numbers, and how to configure IPv6 access control lists. There are standard, extended, and extended named ACL questions on the exam. Learn where to apply ACLs and how that affects filtering and performance. Students should also study local account authentication options and device passwords.
7. Cisco IOS Commands
Students should make a cheat sheet for all configuration topics and associated show commands. Read the official CCNA syllabus and note every instance where configure and verify keywords are mentioned. Include protocols such as DNS, DHCP, and HSRP as well where configure is not specified. There are performance-based labs that will require you to configure and verify multiple protocols. For example, OSPF, static routes, Etherchannel, trunking, NAT, and DHCP snooping. Know how to analyze the output of show commands to determine configuration settings for a device as well.
Cisco Performance-Based Simulation Labs (2025)
8. IPv6 Addressing
This topic has a reputation for lowering the score of CCNA test-takers. IPv6 addressing has been implemented as almost a second level of addressing within the enterprise. As a result, some students do not have the experience or spend enough time studying. The questions range from addressing types, configuration of static routes, and addressing methods. Know how to configure SLAAC, EUI-64 interface format, and DHCPv6. Distinguish between different prefix lengths and number of hosts for LAN/WAN connectivity. There are also differences between IPv4 and IPv6 network communication protocols.
9. DHCP / DNS Services
DHCP and DNS services extend to different addressing platforms and protocols. They are core network services and the CCNA exam will require basic knowledge. You should know how DHCP communicates with clients and how to configure an IOS server. The same concepts will apply to host-based DHCP for client addressing along with DHCP relay.
As with most network protocols there are port numbers, message types, and show commands as well. Study DNS protocol operation, services, and record types for IPv4 and IPv6. Distinguish between client-based DNS services and Cisco-based DNS configuration. It is important to know both host commands and IOS commands for all IP services listed with the syllabus. Since TCP and UDP transport is so crucial to network communication make sure to know the differences.
10. Software-Defined Networking (SDN)
SDN topic is comprised mostly of architecture and REST-based APIs questions. For example you should study the operational planes and mapped network services. There is also SDN controller operation, functions, and communication with physical devices. That includes northbound and southbound interfaces. You will get questions on REST API operation, authentication methods, and HTTP headers. The authentication methods include basic, JWT, OAuth2, and API keys. Some overlap is starting to exist between networking and DevOps.
This article explains how to create a network automation lab from free software. It is essential that network engineers learn how to build, test, and debug automation scripts with AI tools.
Ubuntu Server VM is a control node with automation software installed that connects to Cisco Modeling Labs (Free). There are Ansible playbooks and Python scripts included that can be tested to learn how AI-powered scripting works. You will also learn how Network as Code is used to import Cisco labs and create code with prompt engineering techniques.
Table of Contents
Disable Microsoft Hyper-V
Install VMware Workstation
Create Ubuntu Server VM
Install Ubuntu Server Control Node
Install Automation Software and Scripts
Install Cisco Modeling Labs (Free)
Import CML Automation Lab Topology
Windows PowerShell SSH Connection
AI-Powered Scripting Techniques
Disable Microsoft Hyper-V
VMware Workstation and Microsoft Hyper-V are not compatible on Windows Home Edition or Windows Pro. You will get a nested virtualization not supported error when starting CML with VMware. Nested virtualization enables Cisco IOS devices to run as separate VMs within CML VM.
Hyper-V is a Type 1 hypervisor that exclusively manages all hardware virtualization and prevents CML from using nested virtualization with VMware. The same problem will occur when using GNS3 and EVE-NG with VMware. This automation lab setup was tested with VMware Workstation 17.5 installed on Windows 11 Home and Windows 11 Pro. There are separate instructions included for both operating systems.
Disable Hyper-V (Windows Home Edition)
There is only partial support for Hyper-V included with Windows Home Edition. This makes it easier to disable Hyper-V and allow nested virtualization required with CML.
Start Windows PowerShell as Administrator and type the following command to disable Hyper-V launch from Windows. Hint: If you don’t know how to start Windows PowerShell as Administrator ask ChatGPT.
bcdedit /set hypervisorlaunchtype off
Uncheck the following features to disable Hyper-V components in Control Panel and then restart your computer:
Control Panel -> Select Programs -> Select Turn Windows Features on or off
1. Uncheck Virtual Machine Platform
2. Uncheck Windows Hypervisor Platform
3. Uncheck Windows Subsystem For Linux
Memory Integrity Setting:
Type core isolation in Windows search bar, select core isolation, and turn Memory Integrity setting OFF. You will have to restart your computer then continue with lab setup.
Disable Hyper-V (Windows Pro)
This article explains how to fully disable Hyper-V on a machine with Windows Pro. Hyper-V is fully supported with Windows Pro and this makes it more complex to disable all Hyper-V components. ChatGPT can provide instructions on how to reinstall Hyper-V software at a later date when VMware is uninstalled.
Install VMware Workstation
Start with VMware Workstation install using the default settings. Skip this step if VMware Workstation 17+ is already installed and proceed to Ubuntu Server install.
Go to support.broadcom.com and log in (or register a free account with valid email)
In the top-right corner, select “Support Portal”, then:
Choose the VMware Cloud Foundation division.
Click My Downloads.
Search for “Workstation Pro”.
Click on the product and choose the “Personal Use” (same binaries).
Be sure to check the “I agree to the Terms and Conditions” box – it unlocks the download
Choose the latest version (e.g., Workstation Pro 17.5.2+ or newer).
Download and install VMware
DO NOT install Windows Hypervisor Platform (WHP) option (leave it unchecked).
On launch, select “Personal Use” if prompted — no license key needed.
Create Ubuntu Server Virtual Machine
Do NOT use an existing Ubuntu Server VM since this lab setup is configured to work with CML. Create a clean install based mostly on default settings except OpenSSH server install.
Download the ISO: Ubuntu Server 24.04 LTS from the official site
Start VMware Workstation
Select Create a New Virtual Machine
Select Typical (recommended)
Installer disc image file (iso)
Browse to your downloads folder and select the Ubuntu Server 24.04 ISO
Name the VM: Ubuntu-Lab
Select a location to store VM files
Disk Settings:
– Minimum: 20 GB (default)
– Choose: Store virtual disk as a single file
Customize Hardware: (accept default settings)
– Memory: 2048 MB (minimum)
– Processors: 2 cores
– Network Adapter: NAT (default)
– CD/DVD: Should already point to the Ubuntu ISO
– Optional: Advanced → Firmware type, enable UEFI if not already selected
Select Finish
Install Ubuntu Server
Ubuntu terminal does not enable full screen view by default. You will have to scroll when navigating during install if display is low resolution or select Full Screen menu option.
Select language → Enter
Select keyboard layout → Done
Select type of installation (default) → Done
Network configuration (default) → Done
Skip proxy configuration (optional) → Done
Mirror location test (wait until reading package lists appear) → Done
Guided storage configuration (default use entire disk) → down arrow → Continue
File system summary (default) → Done
Select Continue to start installation
Profile Configuration
Your name:
Server name:
Username:
Password:
Skip Ubuntu Pro install option → Continue
Install OpenSSH server → spacebar to select → down arrow → Continue
Skip Featured Server Snaps → down arrow → Continue
Installing system…
When installation finishes, then Enter to reboot now
Press Enter when ‘failed unmounting cdrom:unmount error’ occurs.
VMware DHCP Configuration Settings
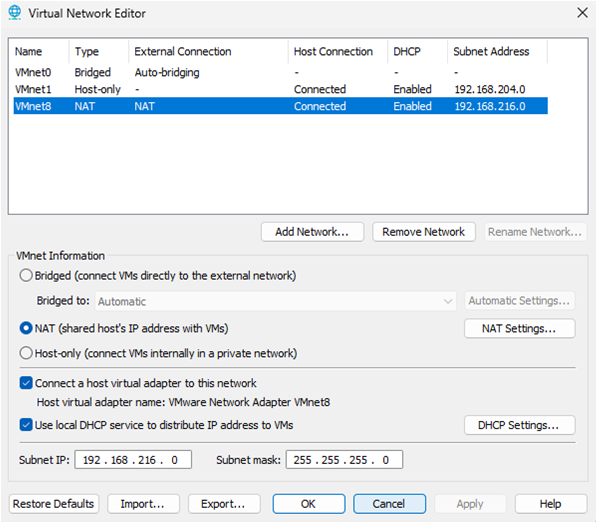
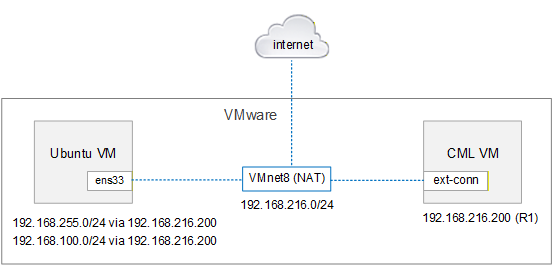
The most current version of VMware (17.5) will often assign 192.168.216.0/24 subnet by default to NAT network (VMnet8). This is used for internet access, Ubuntu host VMs, and communication hub between VMs.
Verify / Update VMware DHCP
Cisco CML automation lab has a default gateway router (R1) with IP address 192.168.216.200/24 on interface E0/1 that links to external-connector. Ubuntu host VM must be assigned to the same subnet (192.168.216.0/24) to enable connectivity. The first step is to verify that VMware is using 192.168.216.0/24 subnet and if not then modify accordingly or select cancel. This update will typically have no effect on any existing VMs since DHCP will change IP addressing seamlessly.
Modify and restart VM or cancel if 192.168.216.0/24 already configured
VMware External Connections via NAT (VMnet8)
Install Automation Software
To prepare the Ubuntu control node for automation tasks you will download a bash script to your home directory. The bash script installs Python, Ansible, Netmiko, and a virtualized (venv) environment for automation. There is also configuration of static routes, rsyslog, and ansible.cfg for playbooks. The purpose of venv is to isolate your lab setup from Python global environment. This is a best practice so that all software and version updates apply only to your automation lab to prevent conflicts. Use clear command to declutter Ubuntu terminal of text.
Step 1: Login with the Ubuntu sudo username and password you created for this VM.
Step 2: Download the bash script to your home directory:
Step 4: Run the bash script to install automation software on the Ubuntu control node:
username@ubuntu:~$ ./ubuntu-automation-setup.sh
Step 5: Start the virtualized environment (venv) for creating and running automation labs. This is only done once here since Ubuntu is configured to start venv automatically:
username@ubuntu:~$ source ~/.bashrc
Your network automation environment is now fully installed and configured. You’re ready to start building and testing automation scripts using nano editor and ChatGPT. The bash script added two static routes on Ubuntu control node for CML connection that can be displayed with ip route show command.
Install Cisco Modeling Labs (CML-Free)
Cisco Modeling Labs includes a free tier version with 5-node limit. Learn how to create and test automation scripts on real Cisco IOS. The is preferrable to emulated lab environments such as GNS3 and EVE-NG that are error prone and more complex to setup similar labs. You can also upgrade to CML Personal and use it for real lab testing at work and certification study. Share labs with a YAML text file instead of large binary project files used by GNS3 and EVE-NG.
Create and test automation scripts on Cisco approved IOS.
Less complex to setup than GNS3 or EVE-NG that are error prone.
Share labs with a YAML text file instead of large binary projects.
Upgrade to CML Personal for additional nodes.
This section explains how to install Cisco Modeling Labs (v2.8) to VMware Workstation and import a lab-ready (Network as Code) topology.
Download CML Files From Cisco
Step 1: You will need to first register for a Cisco CCO account. Skip this step if you already have an existing account.
Step 4: Select Modeling Labs on right side-bar and then select CML-Free 2.8 release. The following CML files are for VMware and have been tested with CML 2.8 stable version.
Step 5: Navigate to your Windows download directory. Close any existing VPN connection.
Step 6: Extract refplat-20241016-freetier-iso.zip to a folder for install.
Step 7: Right-click on cml2_f_2.8.1-14_amd64-35.ova and select Open with VMware Workstation.
Step 8: Follow prompts in the VMware Import Wizard.
Select VMware for personal use Name for new virtual machine: CML Storage path: default and select Import
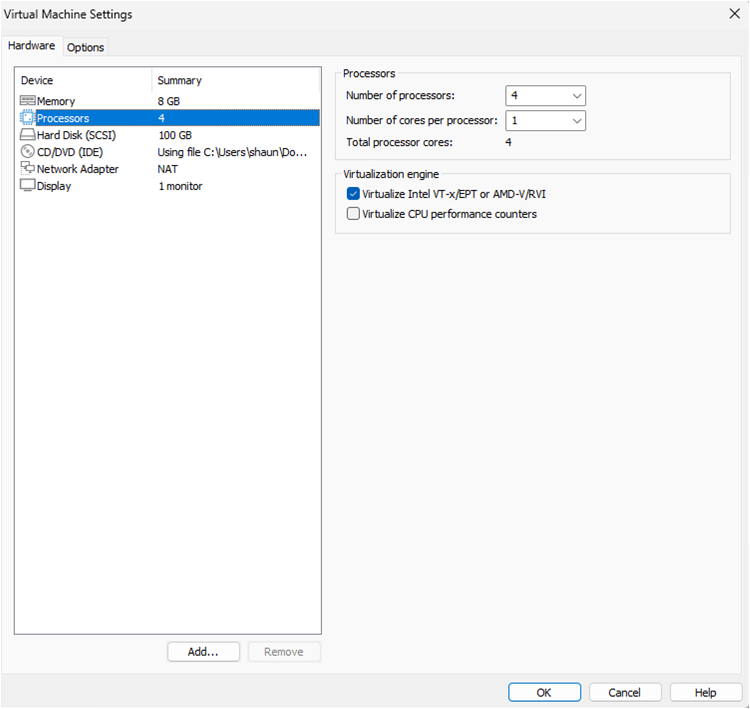
Step 9: CML Virtual Machine settings will open (Do NOT start VM).
Step 10: Verify the following options are set accordingly.
Number of processors = 4 Number of cores per processor = 1 Check Virtualize Intel VT-x/EPT or AMD-V/RVI
Memory: 8GB or more (recommended)
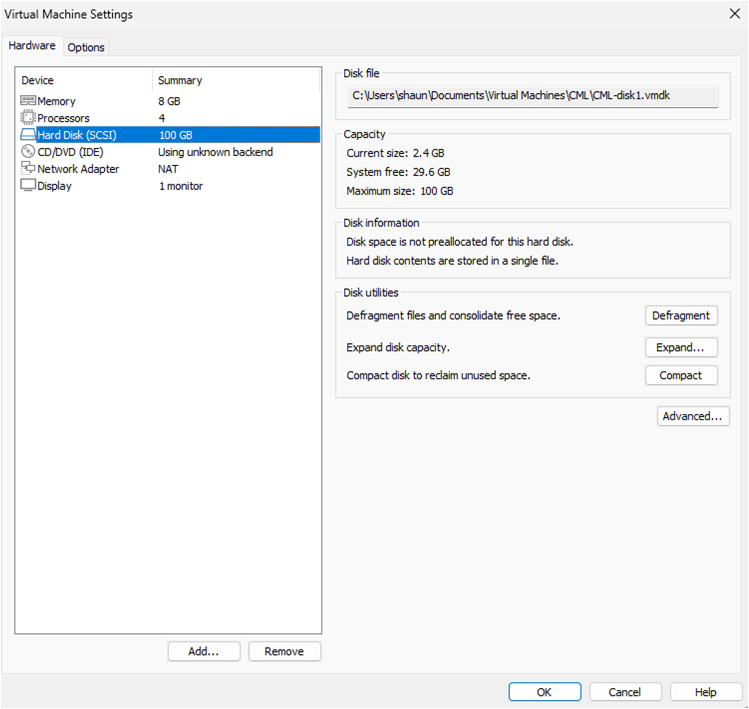
Hard Disk: Expand disk capacity to 100 GB minimum recommended and ignore message. The disk size will automatically resize when virtual machine is started. This is a maximum size only with thin provisioning that assigns disk space based on usage.
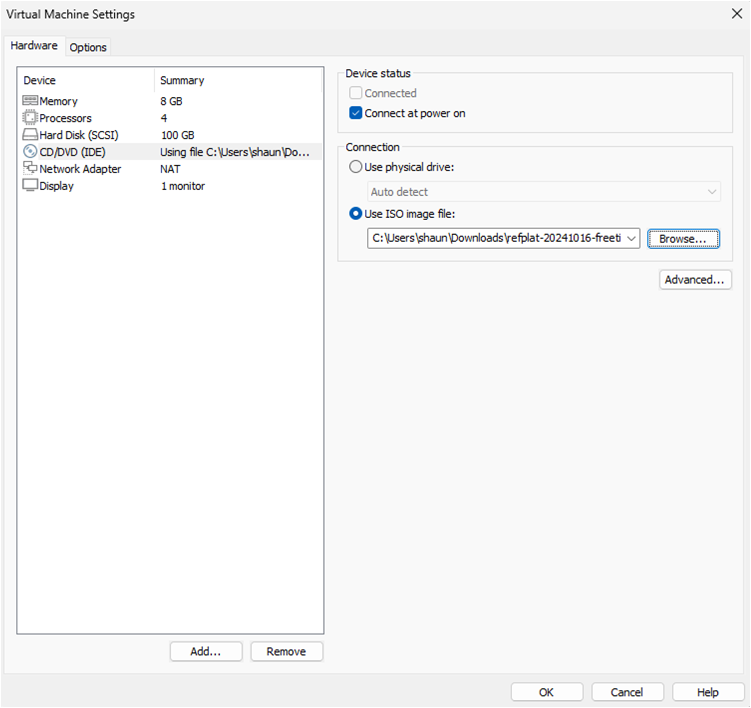
CD/DVD: Check the ‘use ISO image file’ check box. Browse to your downloads directory and open refplat-20241016-freetier-iso folder. Select refplat-20241016-freetier file.
Check the ‘Connect at power on‘ check box.
Network Adapter: Select NAT
Step 11: Power on virtual machine and accept EULA (use arrow and tab keys).
Step 13: Enter system unique hostname: cml-controller (default)
Step 14: Create sysadmin account and assign password. Select yes to ignore password warnings.
Step 15: Create user admin account and assign password to access CML labs via Web UI. Select yes to ignore password warnings.
Step 16: DHCP to configure IPv4 address from VMware (default) hit Enter.
Step 17: Confirm settings. CML will start copying refplat images at this point. This will take around 5-15 minutes to copy IOS images based on your laptop speed. Select Continue button and wait for CML server to reset.
Step 18: Click on link to download automation lab topology for import to CML. This is a text file approximately 30KB size that provides configured devices as shown. There are also some networking features that will be configured with Ansible and Python.
Step 19: Access CML UI from your browser with DHCP assigned IP address shown in the CML VM console (ignore 9090). Select Advanced button to ignore any SSL certificate warnings, and select Proceed. This command is an example with default admin username and your assigned IP address could be different.
https://192.168.216.129
Username: admin
Password: **********
Step 20: Select Import and browse to your downloads directory. Select automation ready lab topology student_automation_lab.yaml and import into CML. Your browser could randomly disconnect from CML server when there is inactivity. Click your browser reload button to refresh web page only if this occurs.
Step 21: Select Start Lab and wait a minute for lab topology to initialize. This only occurs once when importing a new Cisco lab and sometimes will require starting an individual network device/s with right-click start lab option.
Step 22: Console and create SSH key on each Cisco device since they are not imported automatically. Press enter key to accept default 2048 bits key length.
device>enable
Password: cisco
device(config)#crypto key generate rsa
Choose the size of the key modulus. How many bits in the modulus (2048): Enter
Save the running configuration to startup configuration on each device.
device#copy run start
Windows PowerShell Access
The preferred method to access Ubuntu control node is from Windows PowerShell via SSH. This is recommended since PowerShell has Windows style terminal navigation, text readability, and easy to copy/paste text blocks. Creating your own scripts will require copy and paste from ChatGPT to Ubuntu nano editor. There is also copy and paste of script errors from Ubuntu to ChatGPT for troubleshooting or refactoring. Attempting to do this from within Ubuntu basic terminal is an exercise in frustration to say the least.
Step 1: Start with identifying the IP address that VMware has assigned to Ethernet interface (ens33) on Ubuntu control node:
(cml-automation-venv) username@ubuntu:~$ ip a
Step 2: Start Windows PowerShell and SSH into Ubuntu control node with Ubuntu username and IP address: (type yes to ignore key error and continue)
The following directory structure is automatically created when scripts.tar was untarred with bash script. Ansible playbooks are coded with vault feature for SSH password encryption and Python scripts use getpass feature for the same purpose.
*Do not test and/or debug any lab scripts included here in your production environment.
AI-Powered Prompt Engineering For Network Automation
You are ready to start using the automation lab and run scripts for testing and updates. The purpose of this automation lab is to learn how to create, run, and troubleshoot scripts with ChatGPT. All of the Ansible playbooks and Python scripts provided were 100% created with ChatGPT. Learning how to develop automation scripts with ChatGPT is essential for network engineers. You can generate and troubleshoot scripts in seconds that would take you hours or days if at all.
Creating Ansible Playbooks and Python Scripts
Creating automation scripts with ChatGPT is an iterative process of prompt, test, debug, and validate. You will have ChatGPT debug errors along with how scripts are run and reports. This is common and results from prompts with missing details or context.
Prompt Engineering: The responses from ChatGPT are only as good as the prompts you input. Each prompt should provide context that includes your current setup and what you want to accomplish. This should include virtualization software, automation tools, hosts file, and Cisco network details for example. Then include functional requirements to define an effective prompt that ChatGPT can use to create script.
Context Example: VMware, Ubuntu Server control node 24.04, ansible vault enabled, SSH connect to Cisco devices, IOS-XE, IP addressing, paste hosts.ini file or python hosts file.
Functional Requirements Example: ansible playbook, backup startup configuration, explain purpose of script or paste IOS command/s, report format (.txt/html) and directory, security issues, addressing, cisco module features, verify updates, and save configuration.
Step 1:ChatGPT Prompt
My current setup is VMware with Ubuntu server control node that connects via SSH to Cisco devices running IOS-XE. Ansible vault.yaml is already configured with encrypted SSH password and enable secret password. This is my hosts.ini file for reference. Create an Ansible playbook based on this pasted hosts.ini file. The script should backup startup configuration first and then configure service password encryption on all devices from all_cisco inventory group. Print the results to terminal and also a text report saved to ~/scripts/ansible/reports directory. Save the running configuration and use Cisco module that supports idempotency, error checking, and configuration validation.
Step 2:Copy/Paste Script to Nano Editor
Start Ubuntu nano editor with the name of your new Ansible playbook or Python script. Paste the code copied from ChatGPT grey box to nano editor with right-click. Save the file with Ctrl-O and hit Enter to confirm write. Exit nano editor with Ctrl-X and return to Ubuntu command line.
Create an automation lab where preliminary testing and debugging of scripts can be done without affecting the production network. It is recommended to have hosts file in the local working directory.
Step4: Debug Script
Any error messages can be copied to ChatGPT for analysis and to modify script. There are often issues with how script runs and reports that do not necessarily generate error messages. Ask ChatGPT for a full modified playbook or script since mistakes are often made with pasting snippets into original script.
Step 5:Post-Run Validation Test Plan
Some examples of functional tests include HSRP failover, interface shutdown for routing behavior, or performance tests. You could verify Syslog operation for example by shutting down an interface and run cat /var/log/syslog command. This Ubuntu command will list the interface down system message generated at bottom of log. ACL tests are another example that involves sending destination traffic and verify filtering is working correctly.
ChatGPT Prompt: Python
My current setup is VMware with Ubuntu Server 24.04 control node that connect via SSH to Cisco L2 and L3 switches running IOS-XE. This is hosts file called switches.txt pasted here that lists IP addresses of switches. Python script must be implemented with getpass to prompt for SSH password and secret enable password. This is a security policy so that no device passwords are hard-coded in script. The script should backup startup configuration first and then parse running configuration to check if enable secret command is present on all target devices. Print the results to terminal and also a text compliance report saved to ~/scripts/python/reports directory.
How to Run Ansible Playbooks
The following commands are used to run Ansible playbooks from Ubuntu control node. Ansible hosts.ini file is mandatory since it provides hostname and IP address of Cisco devices. The only Ansible playbook that does not use vault password is ping_check.yaml since there is no SSH login. Run Ansible playbooks from home/scripts/ansible directory and include –ask-vault-pass keyword for vault password. All text reports are saved to reports directory except cisco_backups and viewed with cat |more command. Start with SSH from PowerShell to Ubuntu based on your Linux username and IP address that VMware assigned to your VM. (e.g., 192.168.216.128)
ssh username@ipaddress
(cml-automation-venv) username@ubuntu:~$ clear
(cml-automation-venv) username@ubuntu:~$ ls -l
(cml-automation-venv) username@ubuntu:~$ cd scripts/ansible
The following commands are used to run Python scripts from Ubuntu control node. You will be prompted for SSH username and password used for Cisco device login. There are devices.txt and switches.txt host files with hostname and IP address used by scripts. Run Python scripts from home/scripts/python directory. All .txt/.html reports are saved to reports directory and viewed with cat |more command.
(cml-automation-venv) username@ubuntu:~$ cd scripts/python
The following are some suggestions for creating playbooks to modify the CML lab topology. They are all functional requirements that can be used as part of a ChatGPT prompt along with context to generate different playbooks. I have noted the inventory group names specified in hosts.ini that can be viewed with cat |more command. Follow the prompt engineering steps so that ChatGPT can generate accurate error-free scripts.
The following are some suggestions for creating Python scripts with ChatGPT to modify the CML lab topology. I have noted the hosts filename that should be pasted to ChatGPT prompt along with context and any other functional requirements for each prompt. Follow the prompt engineering steps so that ChatGPT can generate accurate error-free scripts.
show interface status on switches (switches.txt)
report down interfaces only (devices.txt)
collect device hostname, model, serial number, ios software version (devices.txt)
configure exec-timeout 1 to line vty 0 4 (devices.txt)
detect interface collisions from duplex mismatch (switches.txt)
parse running configuration: list ACLs and static routes on devices (devices.txt)
configure minimum password-length 12 to all Cisco device passwords (devices.txt)